
Libuv: Exploring the Core of Asynchronous I/O in Node.js
I am a backend developer with interests in distributed systems, database internals and software architecture.
Every developer who has used Node.js knows that its runtime, although single-threaded, handles concurrent requests efficiently thanks to asynchronous I/O and the event loop.
However, the library powering these features, Libuv often goes undiscussed. While understanding Libuv isn't necessary to get started with Node.js, delving into its fundamentals can offer deeper insights into the inner workings of Node.js for those who are curious.
Libuv fundamentals:
Libuv is designed around the event-driven asynchronous I/O model.
It operates based on the idea that a system's most common activity involves dealing with some form of input and output. The problem with using conventional I/O functions is that they are blocking; the functions don't return until the task is complete, leaving your program idle. For programs that require high performance, this is a major setback as other activities and operations are kept waiting.
To solve this problem Libuv uses an asynchronous non-blocking style. Most modern OSs provide event-based notification subsystems. The way this works is that Libuv requests the OS to watch certain resources and put an event notification in the queue whenever the resource is ready or some data is available. Then the application can inspect the events at its convenience and grab the data. It is asynchronous because the application expressed interest at one point, and then used the data at another point. It is non-blocking because the application process was free to do other tasks during this period.
The non-blocking network I/O is performed using the best mechanism available epoll on Linux, kqueue on OSX and IOCP on Windows.
While the Network I/O is performed on a single thread asynchronously, File I/O is done using separate threads. Libuv has a global thread pool on which all loops can queue work. 3 types of operations are currently run on this thread pool: File system operations, DNS function (getaddrinfo and getnameinfo) and user-specific code. The default pool size is 4 but can be changed using UV_THREADPOOL_SIZE environment variable of which the max value is 1024.
Event loop:
At the heart of Libuv lies the event loop. This loop goes through multiple stages in each iteration and continues to run until it's shut down. It's responsible for coordinating all I/O operations and is specifically designed to operate on a single thread. However, it's possible to run multiple event loops in parallel, as long as each one is confined to its own thread.
Below we can see its different stages:
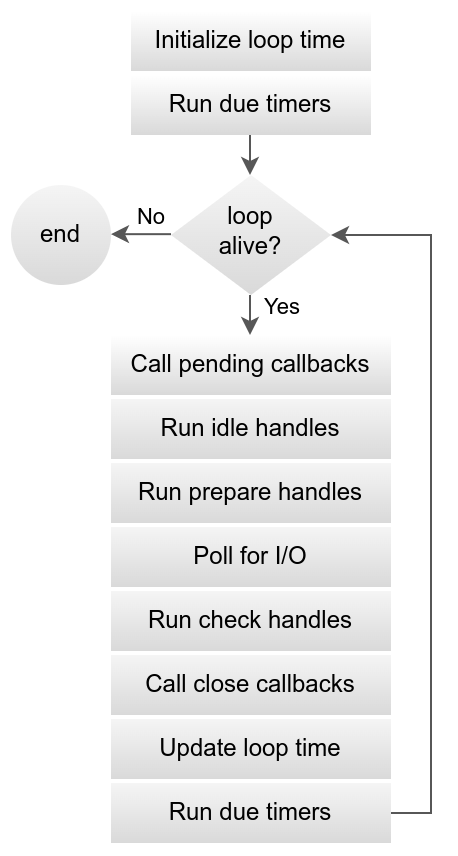
Stages:
First, the loop is initialized, and its concept of "now" is set. Any pending timers are run. Next, we enter the loop if it is alive. The loop is considered alive if the loop has any referred handles, active requests, or closing handles.
Any callbacks that were deferred during previous iterations are run here.
Any registered Idle handles are run on every loop iteration if they are active (We'll be coding an idle handler in the coding section of this post).
Prepare handles to get their callbacks called right before the loop will block for I/O.
Poll timeout is calculated. Before blocking for I/O the loop calculates for how long it should block. Then the loop blocks for I/O, all I/O-related handles that were monitoring a given file descriptor for a read or write operation get their callbacks called at this point.
Check handles get their callbacks called right after the loop has been blocked for I/O.
Close callbacks are called (i.e. any handle closed with
uv_close()).The loops concept now is updated.
Any pending timers are run.
Loop stop if it was run with
UV_RUN_NOWAITorUV_RUN_ONCE, else if it was run withUV_RUN_DEFAULToption continues from the start if it's still alive.
Along with event-loop, Libuv provides two abstractions to work with
Handles: Handles are long-lived objects that can perform certain operations while they're alive.
For example, an Idle handle gets its callback called during every loop iteration while active. TCP handle gets its callback called whenever there's a new connection.Request: Requests are short-lived operations that are performed over a handle. For example, a TCP write operation or a filesystem operation.
Now that we have covered the fundamental concepts of Libuv let's dive straight into writing some C code and experiencing the library firsthand.
Before we begin we'll have to install the Libuv C library on our system. We won't be discussing the installation steps here as there are resources available online and it's fairly straightforward.
Libuv hello-world:
For the hello world of Libuv, we will see how we can start and exit an event loop. The C code below has two functions both creating an event loop but in two different ways.
#include <stdio.h>
#include <stdlib.h>
#include <uv.h>

// memory allocated explicitly
void managedLoop() {
    uv_loop_t *loop = malloc(sizeof(uv_loop_t));
    uv_loop_init(loop);

    printf("Running Managed loop.\n");
    uv_run(loop, UV_RUN_DEFAULT);
    printf("Loop quit.\n");

    uv_loop_close(loop);
    free(loop);
}

// memory managed by libuv
void defaultLoop() {
    uv_loop_init(uv_default_loop());

    printf("Running Default Loop.\n");
    uv_run(uv_default_loop(), UV_RUN_DEFAULT);
    printf("Loop quit.\n");

    uv_loop_close(uv_default_loop());
}

int main() {
    managedLoop();
    defaultLoop();
    return 0;
}
The defaultLoop function makes use of the uv_default_loop function to create a default event loop whose memory is managed by Libuv. We should use this loop if we only want a single loop.
In the managedLoop function, we manually allocate and free the memory for the loop.
The rest of the steps are similar in both functions:
The
uv_loop_initfunction initializes the loopuv_runruns the event loop. It will act differently depending on the specified mode:UV_RUN_DEFAULT: Runs the event loop until there are no more active and referenced handles or requests.UV_RUN_ONCE: Poll for i/o once. Note that this function blocks if there are no pending callbacks.UV_RUN_NOWAIT: Poll for i/o once but don’t block if there are no pending callbacks.
uv_loop_closereleases all internal loop resources.
Both loops run once and quit immediately since there are no active handles. They produce the following output:
Running Managed Loop.
Loop quit.
Running Default Loop.
Loop quit.
Timer and Idler pattern:
Now that we know how to build an event loop let's add some functionality to it. Let's try to implement operations similar to setTimeout and setInterval in JavaScript.
#include <stdio.h>
#include<stdlib.h>
#include <uv.h>

// Keeps track of event loop iterations.
int64_t counter=0;
// Keeps track of set_interval_callback function execution count.
int64_t repeat_count=0;

// Executed for every event loop iteration.
void idle_callback(uv_idle_t* handle) {

    if(counter < 0) {
        printf("Stopping idling: %lld\n",counter);
        uv_idle_stop(handle);
        return;
    }

    counter++;
    printf("Idle callback called times: %lld\n",counter);
}

void set_timeout_callback(uv_timer_t* handle) {
    counter=-1;
    printf("Exectued timeout callback %lld times\n",++repeat_count);
}

void set_interval_callback(uv_timer_t* handle) {
    repeat_count++;

    if(repeat_count>1) {
        counter=-1;
        printf("Exectued interval callback %lld times\n",repeat_count);
        uv_timer_stop(handle);
    }
}

int main() {
    uv_loop_t *loop = uv_default_loop();
    uv_idle_t idler;
    uv_timer_t timer_req;

    // Initialize the handles
    uv_idle_init(loop,&idler);
    uv_timer_init(loop, &timer_req);

    uv_idle_start(&idler, idle_callback);
    uv_timer_start(&timer_req,set_timeout_callback,1000,0); // call once after 1 sec

    printf("Running loop..\n");
    uv_run(loop, UV_RUN_DEFAULT);
    printf("Loop quit..\n");

    uv_loop_close(loop);
    return 0;
}
We utilize two main components here: the idle handle and the timer handle.
The idle handle uv_idle_t, executes the registered callback on every iteration of the event loop. We make use of the idle handle to count the number of executions of the event loop using the global variable counter.
The timer handle uv_timer_t invokes the callback after a given time has elapsed since the timer was started. We can also set them to invoke at regular intervals.
Code explanation:
We start by declaring the event loop, the idle and the timer handles.
We then initialize both handles using their respective initialization functions.
Next, we register the callback for the idle function. This callback executes on every iteration of the event loop and logs the number of times it has been called. This continues until the counter is set to a negative value, which then stops the idle handle.
Next, we start the timer handle with a timeout of 1000 milliseconds after which the callback is called and an optional repeat value which specifies to repeat calling the callback after the given milliseconds in this case it's 0 so it's not repeated.
Then we run the event loop in
UV_RUN_DEFAULTmode.
In this example, the idle_callback function executes during every iteration of the event loop. This continues until 1 second has passed, at which point the set_timeout_callback function is triggered. This function sets the counter to -1, effectively stopping the idle_callback. Since there are no more active handles or callbacks, the event loop exits. The last few lines of output will be something like this:
Idle callback called times: 66373
Idle callback called times: 66374
Idle callback called times: 66375
Idle callback called times: 66376
Idle callback called times: 66377
Exectued timeout callback 1 times
Stopping idling: -1
Loop quit..
This completes the setTimeout-like execution.
Now to execute the setInterval logic change the uv_timer_start call and register the set_interval_callback function with a 2-sec interval like so:
uv_timer_start(&timer_req,set_interval_callback,2000,2000);
On execution, the set_interval_callback will be called repeatedly with 2-sec intervals and the callback will make use of the repeat_count variable to stop after 2 repeated calls. The last few lines of output will be something like this:
Idle callback called times: 263497
Idle callback called times: 263498
Idle callback called times: 263499
Idle callback called times: 263500
Idle callback called times: 263501
Idle callback called times: 263502
Idle callback called times: 263503
Exectued interval callback 2 times
Stopping idling: -1
Loop quit..
All of the above code is available here for reference.
Conclusion:
Understanding the intricacies of any technology often requires diving deeper than the surface-level features. Libuv is one such underlying library that plays a crucial role in Node.js's ability to handle asynchronous operations efficiently. While you don't need to be an expert in Libuv to use Node.js, having a grasp of its fundamentals can provide valuable insights into the inner workings of the runtime. This blog post aimed to shed light on the core concepts of Libuv, from its event-driven asynchronous I/O model to the event loop and its various stages. We also explored some hands-on C code examples to demonstrate these concepts in action. A deeper understanding of these underlying mechanisms can only serve to make us better at what we do.